
Building a PC might sound like a daunting task reserved for tech wizards and computer geeks, but it’s actually a thrilling adventure anyone can embark on. Imagine crafting your own digital masterpiece, tailored to your unique needs—whether it’s gaming, graphic design, or just browsing cat memes in ultra-HD. Plus, you’ll finally be able to impress your friends with your newfound skills and maybe even earn the title of “Tech Guru” at the next gathering.
Understanding PC Components
Building a PC involves understanding essential components. Each part plays a vital role in the overall performance of the system.
Central Processing Unit (CPU)
The CPU acts as the brain of the computer. It processes instructions and executes calculations. Multiple cores enhance its ability to handle tasks simultaneously. Intel Core i5 and AMD Ryzen 5 represent popular choices for many users. Considering clock speed is crucial; higher speeds generally yield better performance.
Graphics Processing Unit (GPU)
The GPU manages rendering images and video. This component is fundamental for gaming and graphic-intensive applications. NVIDIA and AMD are leading manufacturers in this space. A higher VRAM typically enhances performance in high-resolution environments. Evaluating benchmarks helps determine the best option for specific needs.
Motherboard
The motherboard connects all components and enables communication between them. Choosing the right size and socket type matters based on the CPU and other parts. Features like USB ports and RAM slots vary across models. ASUS and MSI offer popular options that provide robust performance. Compatibility with other hardware ensures smooth operation.
Memory (RAM)
RAM temporarily stores data for quick access. More RAM results in smoother multitasking and faster load times. It’s available in various capacities, commonly ranging from 8GB to 32GB. DDR4 is the current standard for most builds. Selecting the right speed, often measured in MHz, can also impact overall system efficiency.
Storage Options
Storage choices impact data access speeds. HDDs offer larger capacities but slower speeds compared to SSDs. SSDs provide faster boot times and application launches, enhancing user experience. NVMe drives represent the fastest option available today. Capacity ranges from 256GB to several terabytes, accommodating various storage needs.
Planning Your Build
Building a PC requires careful planning and consideration of several factors. Establishing a clear approach ensures a successful and satisfying experience.
Setting a Budget
Creating a budget determines how much can be spent on components. Essential factors include the purpose of the PC, such as gaming or content creation. Components like the CPU and GPU often take up the largest portions of the budget. Setting aside funds for peripherals and software is advisable. Tracking prices for components during sales can maximize the budget’s effectiveness.
Choosing the Right Parts
Selecting the right components impacts performance and usability. Choose a CPU that fits the intended workload, with performance-focused options available. The GPU selection plays a critical role in gaming and graphic-intensive tasks. Consider other components like RAM, which should support smooth multitasking. Storage choices also matter; SSDs provide speed, while HDDs offer larger capacities.
Compatibility Considerations
Ensuring compatibility among components is crucial for functionality. First, the motherboard’s socket type must match the CPU’s requirements. Next, RAM speed and size should align with the motherboard’s specifications. Graphics cards require ample space in the case and a compatible power supply. Researching compatibility through reliable resources minimizes issues during assembly. Components that work well together create a stable, efficient system.
The Building Process
Building a PC requires careful attention to detail and organization. To achieve the best results, follow these steps.
Preparing Your Workspace
Establish a clean and clutter-free area for assembly. An anti-static mat protects sensitive components from static electricity. Lay out all tools, including screwdrivers and pliers, to avoid unnecessary searching during the build. Good lighting helps with visibility, ensuring each component is easily identifiable. Having a static-free wrist strap handy adds protection against electrostatic discharge. Follow these preparations to set a strong foundation for the PC build.
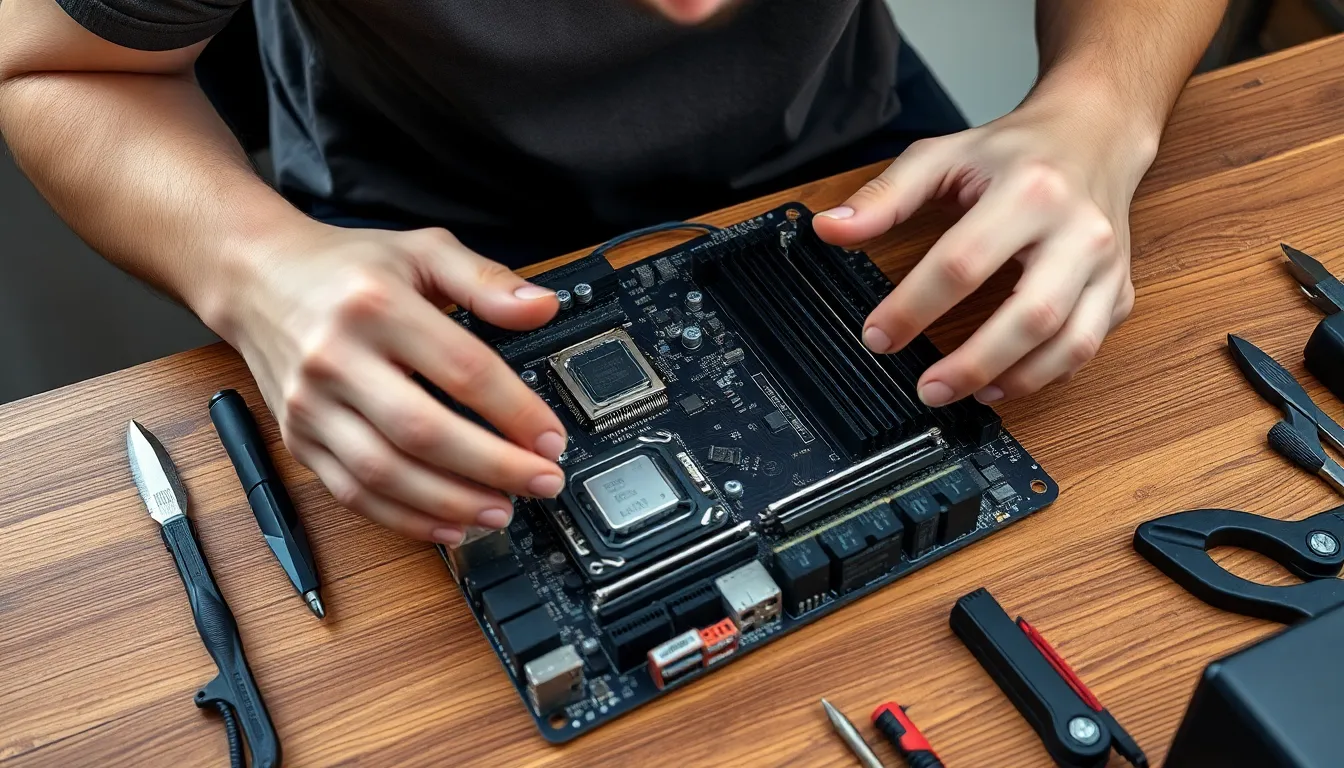
Assembling the Components
Start by installing the CPU in the motherboard socket. Align the notches correctly before gently pressing it into place. Next, apply thermal paste to the CPU, then attach the CPU cooler. Install the RAM sticks into the designated slots, ensuring they click into place. After that, place the motherboard inside the case and secure it with screws. Insert the power supply, connecting all necessary cables. Follow this sequence to maximize efficiency while assembling the components.
Cable Management Tips
Organizing cables creates a neat and functional build. Use zip ties to bundle cables together, preventing tangling and clutter. Route cables behind the motherboard tray for a cleaner look. Label cables to simplify connections later on. Separate power cables from data cables to reduce interference. Following these tips improves airflow within the case, promoting optimal system performance.
Installing the Operating System
Installing the operating system (OS) marks a crucial step in building a PC. This process allows the hardware to interact with software applications effectively.
Choosing an OS
Selecting the right OS involves evaluating personal preferences and intended use. Popular options include Windows, macOS, and various Linux distributions. Windows offers extensive software compatibility, making it ideal for gamers and general users. macOS appeals to creatives, providing optimized performance for graphic design and video editing. Linux caters to tech-savvy users seeking customization and control over their system. Ensure compatibility between the chosen OS and hardware components before proceeding with installation.
Installation Steps
Installation steps vary based on the selected OS but generally follow similar guidelines. Begin by creating a bootable USB drive with the OS installation files. Connect the USB drive to the PC and access the BIOS or UEFI settings by pressing a designated key during startup. Set the USB drive as the primary boot device and save the changes. Follow the on-screen prompts during installation, which typically include partitioning the hard drive and configuring user settings. Completion of these steps will lead to a desktop environment ready for use.
Driver Updates
Post-installation, updating drivers is essential for optimal system performance. Drivers ensure that the OS can communicate effectively with hardware components. Visit the manufacturer’s website for the latest drivers specific to the motherboard, GPU, and peripherals. Installing chipset and graphics drivers enhances stability and functionality. Check for updates regularly to benefit from performance improvements and security patches, ensuring the PC runs smoothly and efficiently.
Testing and Troubleshooting
Testing and troubleshooting ensure the successful operation of a newly built PC. Following a systematic approach helps identify and resolve potential issues.
Powering On Your PC
Powering on the PC begins the troubleshooting process. He or she should connect all power cables and monitor cables properly. Pressing the power button turns on the system. If the PC fails to boot, checking connections becomes essential. Ensure that the power supply is switched on and functional. Observing the motherboard’s LEDs can provide feedback on the status of the components. Hearing beeping sounds from the motherboard indicates specific problems. Different beep codes signal different issues, which can be referenced in the motherboard manual.
Common Issues and Solutions
Common issues arise during and after the initial boot. One frequent problem involves no display on the monitor. Checking cable connections or testing with another monitor resolves this concern. Another issue relates to the PC powering on but failing to POST. Reseating the RAM or graphics card often resolves this problem. Software problems, like the operating system not loading, may stem from improper installation. Creating a bootable USB drive with a fresh OS can resolve this matter. Keeping all drivers updated enhances performance and stability, preventing future issues.
Building a PC is an empowering journey that combines creativity and technical skill. With the right components and careful planning anyone can create a machine tailored to their unique needs. The satisfaction of assembling a custom computer goes beyond performance; it fosters a sense of accomplishment and boosts confidence in one’s abilities.
By following the outlined steps and prioritizing compatibility and organization during assembly it’s possible to achieve a successful build. Regular maintenance such as updating drivers ensures that the system remains efficient and reliable. Whether for gaming or productivity a well-built PC can provide an exceptional experience that meets and exceeds expectations.


